

How to choose the best triathlon aerobars

If you are searching for best triathlon aerobars, start with a simple truth: speed only matters if you can stay in the aero position for the whole ride. A cockpit that looks aggressive but forces you to sit up after 20 minutes is slower in real life. This guide is written for athletes who want a clean, adjustable setup with reliable support over long distances, from short-course to full Ironman.
In triathlon, “best” is rarely the lightest part or the most exotic shape. It is the combination of ergonomics, adjustability and stability that lets you keep your elbows planted and your head low, without numb hands or sore shoulders. Tetsuo’s approach is built around precision carbon components designed to help you ride faster for longer with less fatigue.
Explore what is available in the Tetsuo Aerobars collection and use the sections below to narrow down what your cockpit actually needs.
Before you compare materials or shapes, decide what you need to change in your current position. These questions prevent expensive mistakes and help you choose a system you can fine-tune.
| Fit question | What it changes | What to look for |
|---|---|---|
| Can you stay aero for 45–60 minutes without pain? | Endurance comfort and pacing | High-quality armrest support, soft foams, stable mounting |
| Do your wrists collapse or feel forced? | Hand pressure, braking control and neck tension | Adjustable grip angle, ergonomic extension profile |
| Do you feel too stretched or too cramped? | Breathing, shoulder loading, hip rotation | Reach range, pad fore-aft options, plate solutions |
| Are your elbows sliding or drifting? | Stability in crosswinds and during surges | Pad surface area, wedge tilt, consistent elbow cups |
| Do you need more hydration and computer integration? | Race execution and head position | Compatible bottle and GPS mounts in the cockpit ecosystem |
Many athletes start with clip-ons because they are flexible and can work with different handlebars. As performance goals rise, integrated systems become attractive because they can improve stiffness, cable routing and overall cockpit cleanliness. The key is to avoid locking yourself into a setup that is hard to adjust.
If you are building a long-course bike, an integrated approach can be a practical way to keep your cockpit tidy and stable. For example, the Masamune system is designed around ergonomics and modular compatibility with accessories.
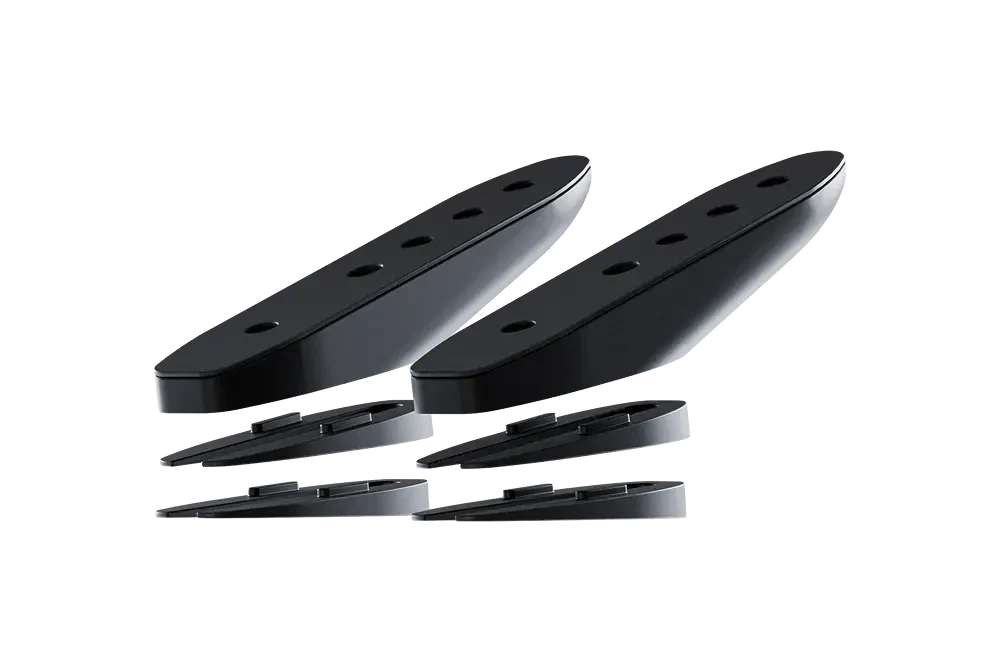
Material choice is not a marketing detail, it affects stiffness, weight, vibration and long-term durability. Tetsuo uses unidirectional carbon fibre in key structures to achieve a strong weight-to-stiffness ratio, while 7075 aluminium is used for high-load adapters and wedges where precise machining and clamping loads matter.
| Component area | Carbon fibre strengths | 7075 aluminium strengths |
|---|---|---|
| Armrest bodies and extensions | Low weight, tuned stiffness, vibration damping | Less common, usually heavier for same stiffness |
| Adapter plates and reach parts | Possible, but machining interfaces are complex | Precise, robust, repeatable torque interfaces |
| Tilt wedges | Possible, but needs careful interface design | Reliable angles, solid clamping, durable |
If you want a deeper technical perspective focused on cockpit design choices, see Masamune Aerobars: Carbon vs Aluminium Analysis.
Aerodynamics is not just about narrow shoulders. It is also about how relaxed your upper body stays when the effort rises. The elbow and forearm interface drives everything else: comfort, breathing and how often you break position.
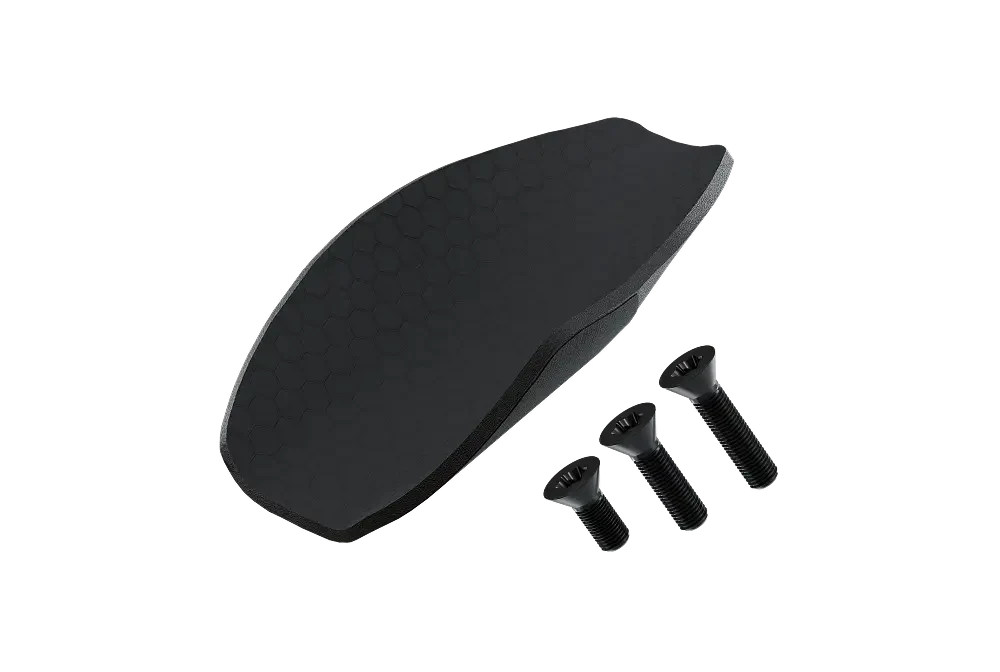
Quality foams reduce pressure hotspots and help you keep a steady elbow position. If your foams are old, compressed or slippery, upgrading can be the fastest comfort fix you can make in a cockpit.
Within the Tetsuo ecosystem you can replace worn contact points with dedicated spares such as TAO X3 Foams or TAO 1 Foams, depending on your setup.
Small changes in wrist angle can reduce hand pressure and shoulder tension. Look for a system that gives you repeatable angles rather than “close enough” adjustments. When your wrists are neutral, it is easier to keep your head low and your shoulders relaxed.
The best systems are not just adjustable on paper. They make it easy to test, measure and repeat. Focus on the adjustment points that typically deliver the biggest gains in comfort and aerodynamics.
Wedges are the clean way to add repeatable tilt and keep your elbow cups stable. In Tetsuo’s range, K-Wedges and the K Wedge adaptor expand your tilt options while keeping the interface robust.
If your cockpit feels too long or too short, a reach solution is often cleaner than forcing your saddle position to compensate. Plates allow controlled reach changes while keeping the front end rigid.
Depending on your bike and mounting standard, you can explore solutions such as Plate Master, Plate Orbea or Plate Canyon Speedmax Disc.
Tetsuo offers different ways to build a fast cockpit depending on how you want to balance simplicity, modularity and upgrade paths.
TAO X3 is designed around ergonomic arm support with lightweight carbon fibre construction and durable foams. It is a practical option for athletes who want a tidy, confident position and compatibility with common dual-stack bikes.
Masamune is built as a complete cockpit concept, with an emphasis on ergonomics, aerodynamics and modular accessories. If you like the idea of evolving your setup over time with dedicated add-ons, this is the direction to consider.
Comfort and aerodynamics matter, but so does execution. A cockpit that holds hydration, computers and spares cleanly helps you stay in position and stay focused.
For bottle placement and stability, explore the Bottle holder and the Bottle holder bar. If you need to fine-tune the angle or height of a BTA setup, a small part like the BTA Wedge can make the difference.
A cockpit is only as reliable as the small parts holding it together. If you need replacements after travel or repeated adjustments, use dedicated fasteners like Tetsuo screws to keep the interface consistent.
Most cockpit problems are predictable. They come from choosing a part that looks fast but cannot be tuned to your body, or from ignoring comfort until it is too late.
For a detailed breakdown, read Best Aerobars for Triathlon: 7 Common Setup Mistakes.
It is tempting to drop the front end and narrow the pads because it looks “pro”. If your breathing feels restricted or your shoulders burn, you will sit up and lose the aero advantage. Build the position you can hold, then refine it.
Sliding forward on the pads increases hand pressure and neck tension. A small increase in tilt can improve support and keep your elbows anchored.
When reach is wrong, many athletes move the saddle to “make the cockpit fit”. This often breaks hip comfort and run performance. A plate-based reach adjustment is usually the cleaner fix.
Compatibility is about stack type, mounting standards and available space for cables and accessories. Always confirm what your bike supports before you commit to a cockpit change.
| What to confirm | Why it matters | Where to check |
|---|---|---|
| Dual-stack vs central-stack | Determines whether a system mounts without adaptation | Bike cockpit spec sheet and product compatibility notes |
| Mounting bolt pattern | Controls which plates and wedges you can use | Measure existing hardware and compare with product specs |
| Hydration and computer clearance | Affects bottle access and head position | Mock setup with current spacers and pad positions |
Once your components arrive, avoid making five changes at once. Adjust one variable, ride, take notes, then refine. The goal is repeatability.
Start slightly wider than you think, then narrow in small steps as long as breathing stays free. A stable upper back usually beats an ultra-narrow position you cannot hold.
Your elbows should rest naturally without pulling your shoulders forward. If you feel stretched, shorten reach before you change saddle position.
Add a small amount of tilt, then test on rougher roads. If your elbows stay planted and your hands feel lighter, you are heading in the right direction.
Different races reward different cockpit choices. The position you can hold for 40 km at high intensity is not always the position you can hold for 180 km while managing nutrition and pacing. Use the table below as a decision shortcut when you are comparing adjustability, support and accessory integration.
| Distance | Main cockpit priority | Typical setup focus |
|---|---|---|
| Sprint | Control at high speed | Stable pads, confident steering, quick transitions in and out of aero |
| Olympic | Repeatable aero position | Comfortable elbow support, wrist neutrality, modest tilt |
| 70.3 | Comfort under sustained load | More pad support, refined reach, hydration access without sitting up |
| Ironman | Fatigue management | Maximum comfort, reliable hardware, clean integration for nutrition and devices |
In shorter races, you change pace more often and spend more time cornering, accelerating and reacting to other riders. Prioritise a cockpit that feels planted when you push hard, rather than chasing extreme tilt or ultra-narrow pads. Stability makes it easier to keep your head low without feeling twitchy at speed.
Over long distances, discomfort compounds. A small pressure hotspot on your forearm can become a reason to sit up repeatedly, and that is where minutes disappear. Long-course builds reward systems with predictable adjustment steps, durable contact points and accessories that keep you fuelling without breaking position. This is the moment where many athletes move from generic clip-ons to a more complete ecosystem so the cockpit works as one unit.
A clean front end is not just about looks. When cables and housings are organised, you reduce friction points, avoid rubbing, and make it easier to service your bike. On modern triathlon frames, internal routing is often part of the aerodynamic design, so an organised cockpit supports the whole system.
If you are upgrading your setup, plan cable changes at the same time. That lets you test reach and tilt without fighting stiff housing lengths. When you later travel with the bike, photos of your spacer stack and pad position help you rebuild the cockpit exactly the same way after packing.
Repeatability is a performance advantage. Mark bolt positions, keep a simple torque routine, and store spare hardware so you can rebuild your cockpit after flights without guesswork. If you often tweak your position, consider keeping a small kit of compatible fasteners and washers so you can maintain consistent interfaces between parts.
A single training ride can tell you whether you are close. If your elbows stay planted, your hands feel light, and your shoulders do not creep towards your ears when fatigue rises, you are on the right path. If you notice numb fingers, a tight neck or a feeling that you are constantly pushing yourself back onto the pads, treat it as a signal to adjust reach or tilt before you chase more aggressive aerodynamics.
The best triathlon aerobars for you will feel almost boring on a steady effort: no fighting the position, no constant re-gripping, no need to sit up to breathe freely. That is what lets the aero gains show up on race day.
If you can hold aero for less than 20–30 minutes due to pain, start with fit variables: pad width, reach and tilt. If your current system cannot adjust these reliably, upgrading becomes worthwhile.
Not automatically. Carbon can offer an excellent weight-to-stiffness ratio and good vibration behaviour, but the “better” choice is the system that stays stable and adjustable on your bike.
Fresh armrest foams and correct tilt often deliver immediate improvements because they reduce pressure hotspots and stop sliding.
Yes, if the bottle is placed where it is easy to reach and does not force you to raise your head. A dedicated mount that integrates with your cockpit helps keep the setup tidy.
To go deeper on selection and setup, use the Tetsuo resources: Triathlon Aerobars 2026: Performance Buyer's Guide and 7 Common Setup Mistakes.

GETTING YOU FASTER
Configure your Masamune